Saturday, 31 March 2012

Rainbow Threads

My old flat used to be walking distance from three sewing/fabric shops, two craft & haberdashery market stalls, a craft superstore and a cake shop with a whole wall full of pretty ribbons. Lots of places for me to buy thread when I ran out of a certain colour... or to dash to for emergency supplies when a deadline was looming.

My new home town just has one small sewing shop, so I've got to look a bit further afield to source lots of the crafty bits and pieces I use for my projects and I'm going to have to make sure I stock up on things more so I don't run out of crucial supplies at critical moments.

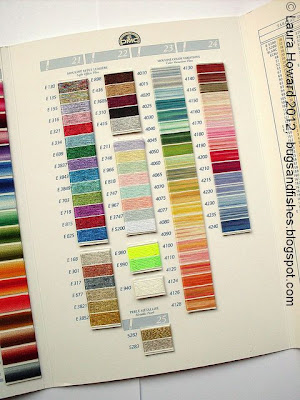
To help me shop for embroidery thread online, last week I ordered a DMC embroidery thread shade card so I can pick the colours I want and then order skeins as and when I need them.


The colour guide is a super duper practical object - it's made up of swatches of all the threads so you can match colours really accurately - but it is also soooooo gorgeous.

Just look at all those colours!


It is quite hard to resist making an "oooh" noise every time I fold it out, and also very hard to resist ordering extra colours I don't need simply because they look so lovely.

The sparkly threads are particularly tempting... I may actually have to invent some projects purely to justify buying some of these shades!


Friday, 30 March 2012

Spring Flowers in Progress

I've got quite a few "works in progress" on the go at the moment, including some pretty spring flowers.

This tray of little pieces will become cherry blossom brooches and headbands...


... I cut everything by hand, so it takes a while (especially when cutting out lots of little fiddly shapes) but it's very relaxing and the perfect task for quiet evenings or low-energy days, or for those times when I'm just not really feeling in the mood for working and can't really focus but I still need to actually, you know, get some stuff done. 

I've got quite a few piles of almost-finished things waiting for their final finishing touches, or for me to buy more of a particular shade of thread. I was most of the way through finishing these auriculas and primroses when I ran out of dark green thread:


Talking of running out of thread, I bought an "emergency" reel of black thread a few weeks ago to tide me over when I'd run out and boy did it get used up quickly! The new reel is pretty massive but it should last me a little bit longer than the last one :)


UPDATE: My primrose design is now available as a sewing pattern! (And the cherry blossom pattern is coming soon!) Visit my shop to see all my printable PDF patterns

Wednesday, 28 March 2012

Postal Prices + Projects Coming Soon

If you're in the UK you'll have seen in the news that the Royal Mail are putting up their prices at the end of next month. The big headlines have been about the price of stamps for sending letters, but the prices for sending small parcels (i.e. everything I send out to my customers) are going up a lot too.

It's going to cost me more to post out both my UK and my international orders...  one size of parcel I send is actually going up in price by 70% (!) as all large "packets" under 750g are going to cost the same to send (previously there were different price bands for different weights). Ugh.

Needless to say, the shipping charges in my shops will have to go up to make sure I'm covering all my costs. I wish I didn't have to do it, but I thought the least I could do was to give you guys a heads up that the rates are changing so if there's anything you've had your eye on you can buy before the end of April and save a bit on the postage.

In happier news, I'm working on a pretty project involving lots of butterflies...


... and I'm busy writing up a tutorial that involves lots of these teardrop shapes.


Fingers crossed I'll have them both finished soon!

Monday, 26 March 2012

New (ish) Packaging

I gave my shop packaging a bit of a revamp at the weekend.

Instead of printing the item info directly onto card to make tags and packaging inserts of various sizes I've switched to using the small labels I use for my return address info, sticking two labels on each bit of blank card: one label with the item type and my website address, and one label with fibre content / care instructions / etc.

It's not a huge change but one which will make a big difference for me - I can mix and match the labels easily as needed, and it will massively cut down on the amount of time I spend feeding sheets into my printer and turning the air blue when it won't behave! (It will also avoid disasters like the time I printed dozens of sheets of card only to find that for some reason the card and my printer ink didn't work together and all the ink smudged horribly and they all had to be thrown away. Ugh)

I've also switched to using pink embroidery thread for my tags, to match the pink candy stripe paper bags I pack my handmade pieces in for shipping. Mmm, yummy colour!


I've also been tinkering in my Etsy shop, updating a few listing photos and adding some more items to my SALE section. I've got a "three for two" offer running on my sale items at the moment, so if you fancy a bargain please do check it out :)

Friday, 23 March 2012

Button, Button, Who's Got the Button?

After a four month wait I'm very happy to finally have some more of these awesome 12.5cm / 5inch wooden buttons back in stock...


... I've been nagging my supplier about them for ages, so I think they're probably quite happy to be able to shut me up for a while, haha! 


They're currently available from my Etsy shop and from my Folksy shop and will be added to the craft supplies section of my website over the weekend.  

Thursday, 22 March 2012

DIY Wedding Ideas with Felt + Washi Tape

The third and final project this week is actually several mini projects - a selection of crafty ideas using pretty washi tape and little felt hearts.

I designed them with a DIY wedding in mind, but you could also use these ideas for engagement or anniversary parties, or for girly birthday parties... any occasion you want to make extra special with a bit of crafty love and lots of matching/themed details.


The basic how-to goes like this:

1) Choose a pretty washi tape that matches your chosen felt colour, or a felt colour that matches your favourite washi tape! I used "deep pink" wool blend felt (from the range I sell in my shop) and cute polkadot tape from Papermash.

2) Cut out lots of felt hearts using the template from this project. (Check out this post for tips on cutting out small felt shapes).

3) Stick felt hearts and bits of tape to everything paper-based to do with your party :)

You can tear the washi tape to give a lovely rough-edged look, or cut the tape to be slightly longer than required and trim any excess with scissors. I turn the tags/card/etc over first and use the paper edge as a guide when cutting, for extra neatness.


The felt hearts can be stuck in place with a dab of craft glue or small pieces of double-sided sticky tape.


Here are a few ideas for ways to use the hearts + tape...

Mini invitations or "Save the Date" cards. I handwrote these, but you could type a page of invites (leaving space on the right for adding the decoration) and print them onto blank card... or write one in your best handwriting, scan it in, copy and paste to create a full page of ready-to-decorate invites.


Add a strip of tape to the envelope - either on the front, or use the tape as a decorative "seal" on the flap (washi tape peels off quite easily so make sure your envelope is properly sealed if you're sending it through the post!).

Place cards. More mini cards, with a small space to write a guest's name. 


Bags of Confetti or Favours for your guests. Fill mini glassine envelopes with confetti, or with sweets / other small favours and seal it with a piece of the washi tape (extra bonus points if the contents match the colours on your chosen tape!).


I filled my envelope with cute heart-shaped polkadot buttons from Big Fish - a mini envelope full of buttons and bits of ribbon would be a lovely party favour for a craft-themed birthday party.

Food Labels. Make sweet and simple labels for piles of sandwiches, cakes or other food you're serving at a buffet. Put the details of the food on the front, with a line of tape along the bottom, and then tear a small piece of tape and use it to fix a cocktail stick to the back. You could use clear sticky tape for the back if you prefer, but I quite like the idea of the back looking almost as cute as the front.


Gift tags. Finally, if you're hosting a party for someone and you've got gifts to wrap, why not make some pretty tags? You could also use these at a wedding if you're giving little gifts to your bridesmaids, etc. Use plain wrapping paper in colours picked out from the tape.

Decorate large tags with tape and a trio of hearts (plenty of room to write a special thankyou message on the back)...


... or decorate mini tags with a single felt heart. 


Please note: this tutorial is for non-commercial use only. You may borrow one or two photos if you want to blog about my projects but remember to credit me and link back to the original source, and do not reproduce entire blog posts on your site. Thanks! 

Fancy some more project ideas? Subscribe to my newsletter for a monthly free pattern and visit my crafty tutorial archive for lots more free projects.

Visit my shop to buy my printable PDF sewing patterns:

Wednesday, 21 March 2012

Bargains + Parrots

I've added a few things to my Etsy shop this week...

There's a few bargain felt bundles:

A selection of "not quite perfect" felt squares that are have a small mark on them or are slightly mis-shapen - update: these have now been sold.


A pack of bright felt pieces that aren't quite square: 


And some grey felt squares in colours I don't normally sell (I ordered these by mistake, oops!).


 There's also a bargain bundle of elasticated sequin trim - 20 metres for just £4! Update: these have now been sold.


And there's also an extra large embroidery thread box (+ 72 embroidery threads and bobbins to wind them onto). This box is 1cm deeper than the other boxes I sell, has movable dividers and is sturdier than the other boxes but I've listed it at the same price. Update: this has now been sold.


I've also listed the two parrots I stitched for Heart-Felt Holidays. There's a parrot brooch...


... and a large pirate parrot to wear as part of a pirate costume. Arrr!


They can all be found over in my Etsy shop.

Tuesday, 20 March 2012

DIY Lucky Four-leaf Clover Card

This tutorial is very simple, but (I think) rather cute - a Good Luck card decorated with a felt four-leaf clover.


You can keep the card super-simple...


... or add a pretty mini paper doily to "frame" the clover.


To make this card you will need...
- card
- the heart template at the bottom of yesterday's post
- small pieces of green felt
- a green felt tip pen or coloured pencil
- sewing scissors
- craft glue
- optional: a small paper doily 

Use the template to cut out four green heart shapes. Check out this post for tips on cutting out small felt shapes.


If you're using a paper doily now's the time to stick it in place. To stick mine, I placed the doily face down on a piece of scrap paper and carefully dabbed it with a glue stick. I then carefully peeled the doily from the paper, lightly positioned it on the card (leaving space to write the message below it) and pressed down to secure it in place. You could alternatively use pieces of double-sided tape to stick the doily in position.

Use small dabs of craft glue to stick the four felt shapes on the card as shown, so the four points meet in the middle. Try to arrange them so they're at a slight angle (i.e. so they're not pointing North, South, East and West).


Then use a green pen or pencil to draw a stem on your clover. If you prefer you can draw the stem before you glue the last (bottom) heart shape in place.

Finally, write "Good Luck!" underneath the clover. If you're worried about making the text central / neat, try writing the message lightly in pencil first to test out the positioning - then write over the pencil with your pen and erase the pencil markings.


Please note: this tutorial is for non-commercial use only. You may borrow one or two photos if you want to blog about my projects but remember to credit me and link back to the original source, and do not reproduce entire tutorials on your site. Thanks!

Enjoyed this free tutorial? Buy me a "coffee" and help support my blog!

Buy Me a Coffee at ko-fi.com

Subscribe to my newsletter for a monthly free pattern and visit my crafty tutorial archive for lots more free projects.

Visit my shop to buy my printable PDF sewing patterns:

Monday, 19 March 2012

DIY Felt Flower Card

Today's tutorial is for a quick and easy felt flower card - perfect for birthdays, Mother's Day, or any other occasion when a floral card fits the bill!


To make this card you will need:
- the heart and leaf templates provided at the bottom of this post
- plain card
- small pieces of craft felt in green and pink (or whatever other colour you want to make your flower)
- a mini button (or a sequin, or a small circle of felt)
- a pencil
- a green felt tip pen or coloured pencil
- sewing + craft scissors
- craft glue
- optional: decorative washi tape

If you're using washi tape, tear or cut a strip and stick it along one edge of the card. Fold the ends over, or carefully trim the excess tape with scissors. You could achieve a similar effect by cutting a narrow strip of gift wrap or other decorative paper and sticking it in place with glue or double sided tape.


Use the templates provided to cut out two felt leaves and five heart-shaped felt petals. Check out this post for tips on cutting out small felt shapes.


Arrange the pieces on your card as shown with the mini button in the centre of the petals. If you've not used a strip of washi tape / patterned paper, position your flower in the middle of the card.

Use a pencil to make two small dots to mark the position of the button and the point where the two leaves meet, and then set the pieces aside. Then use the dots as a guide to draw a green line to form the flower stem.


Glue the mini button and all the felt pieces in place with small dabs of craft glue.


... and you're done!


Variation: use a larger card blank (arranged landscape instead of portrait) and decorate it with a row of three flowers in different bright colours.

Gift idea: make a set of these flower cards and use a length of ribbon or pretty twine to tie them in a bundle with matching envelopes.

Double click the template / click to open it in a new tab in order to view it full size and print:


Please note: this tutorial is for non-commercial use only. You may borrow one or two photos if you want to blog about my projects but remember to credit me and link back to the original source, and do not reproduce entire tutorials on your site. Thanks!

Enjoyed this free tutorial? Buy me a "coffee" and help support my blog!

Buy Me a Coffee at ko-fi.com

Subscribe to my newsletter for a monthly free pattern and visit my crafty tutorial archive for lots more free projects.

Visit my shop to buy my printable PDF sewing patterns:

Sunday, 18 March 2012

Better Late Than Never

I've got a few tutorials to share with you this coming week - some quick and easy crafty ideas based around a simple heart-shaped template.


I'd originally hoped to have them sorted by early last week (just in time to get crafting for St Patrick's Day and for Mothering Sunday here in the UK) but, alas, I didn't have time. Even though they're a bit later than planned, I hope you'll still enjoy them!

The first project will be posted tomorrow :)