This tutorial is sponsored by Bostik - it's the second in a series of crafty projects I'm sharing using their range of adhesives (click here to see last month's project: a giant floral hula hoop wreath).
I really enjoyed making these cards, they're so simple but so effective (I actually did a little happy dance round the room when I saw how they'd turned out). They'd be perfect for autumn birthdays or just for sending a note to a friend. You could even frame them as a pair to add some autumn colour to your decor!
You will need:
- Blank cards (I used an A5 piece of white card, folded in half)
- Paper or card in autumnal colours (I used sugar paper / construction paper)
- Brown paper (I re-used an old envelope!)
- Craft scissors
- A pencil
- A fine black pen
- A ruler
- The templates provided at the bottom of the post (if you're using different size cards from me, you may need to resize the templates to better fit your cards)
- And craft adhesive suitable for sticking paper and card (I used Bostik Micro Dots and a Bostik Blu Stick)
To make the trees card:
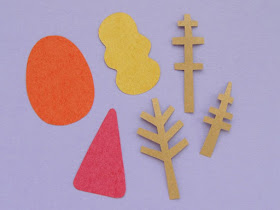
1. Use the templates provided to cut out the three tree shapes (each from a different autumnal colour) and three brown treetrunk and branch shapes.
To cut out each shape, place the paper template on the back of your chosen piece of paper or card and trace around it with a sharp pencil. Then carefully cut out the shape and turn it over so any remaining pencil marks are hidden.
2. Stick the three tree shapes to the card in a row, leaving room for the trunks at the bottom of the card. Start with the central tree shape (A) then add the other two either side.
Tip: lay out all six shapes on the card to test out the arrangement before you stick anything in place!
I used a Bostik Blu Stick to glue my tree shapes to the blank card. The glue in the Blu Stick (as you might guess from the name) starts out blue and dries clear. This means you can easily see which bits of the paper/card you've already glued, but any bits of stray glue won't be visible on your finished project.
3. Next, add the treetrunk and branch pieces to the card. These small, detailed shapes would be quite fiddly to glue with an ordinary glue stick or other craft glue... which is why I've used Bostik Micro Dots instead.
The micro dots work a bit like double-sided sticky tape, except that instead of being one small piece the adhesive area is made up of loads of teeny tiny sticky dots. You peel off the backing paper from the dots, press your shape onto them and then peel it off and - voila! - your paper shape has turned into a sticker!
You can then easily stick the paper shape in position, with no messy glue to worry about.
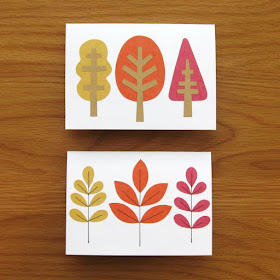
Once you've stuck all three of the treetrunks in position, your finished card will look something like this:
1. Use the leaf templates provided to cut out three sets of leaf shapes: two sets of the smaller leaves (cutting one of piece A, and two each of pieces B, C and D), and one set of the larger leaves (cutting out of piece A, and two each of pieces B and C).
As in the tree card tutorial, trace the shapes onto the back of your chosen paper or card then cut them out and flip them over. This time also make sure to lightly label each piece on the back with the letter that corresponds to the template, so you won't muddle up which leaf is which later.
2. Use a fine black pen and a ruler to draw a line in the centre of your card, approximately 8.5 cm long.
3. Now it's time to add the first leaves!
I decided to use more of Bostik Micro Dots for this and it worked out great - particularly as the small leaf shapes were perfect for using up the leftover dots on the sheet I'd used for sticking the tree trunks (waste not want not, right?).
Stick large leaf A in position on the line you drew earlier, so the top point of the leaf just overlaps the top of the line as shown.
Then add the two B leaves below further down the ink line, then the pair of C leaves further still. Aim to create a roughly symmetrical shape with the points of the leaves all touching the ink line.
4. Use the ruler and pen to draw two more lines either side of the leaves you've already added. I drew two lines measuring 7.5cm each, both about halfway between the outer point of the large leaves and the side edge of the card.
5. Add one set of small paper leaves to each line, using the same method as for the larger leaves: the top of leaf A should just overlap the top of the ink line, then the pairs of leaves should be stuck in place down the line in alphabetical order.
Tip: you may find it helpful to lay the leaves out on the card to test the arrangement before you begin sticking them in place.
6. Finally, add some extra detail to your leaves with the fine black pen. Draw one line along each leaf, from the main line (stem) of the leaves towards but not reaching the leaf tips. You could use a ruler for this or just draw the lines freehand.
Your finished card will look something like this:
A set of the cards tied up with coordinating ribbon would make a great host or hostess gift for autumn visits, or even Thanksgiving.
You could also use these leaf and tree motifs to decorate gift tags - combine them with brown paper and gold ribbon for a fab autumnal vibe!
And, of course, you don't have to make these cards in autumn colours at all: why not cut the tree and leaf shapes from green card or paper, and make springtime cards instead?
DISCLOSURE: this post is sponsored by Bostik, who also provided the Micro Dots and Blu Stick I used to make the cards.
Subscribe to my newsletter for a monthly free pattern and visit my crafty tutorial archive for lots more free projects.
Click here to open the template sheet in a new window, make sure you're viewing it full size then print it at 100%.


No comments:
Post a Comment
Hello there - thanks for leaving a comment! :)
Comments are manually moderated, so don't worry if it takes a while for your comment to show up.
All spam comments will be deleted.