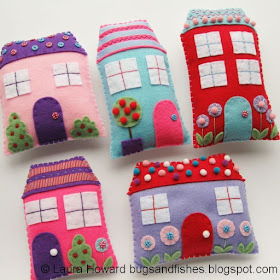
This project originally appeared in docrafts Creativity magazine last summer, and was made using supplies from the docrafts range including lots of cute mini pompoms. Be warned: making these made me want to sew mini pompoms on everything.
I mixed and matched my chosen felt colours across all five houses to make a co-ordinating set. I made my houses with plain white felt at the back as they were designed to be propped up on a shelf so the backs aren't visible, but if you want you can use the same felt colour(s) as the front and add a roof at the back as well.
One of these houses would make a lovely house warming gift - why not personalise it by embroidering your friend's new house number on the door?
You will need:
- the templates provided at the bottom of this post
- craft felt in bright colours
- white felt (for windows and the back of the houses)
- green felt for leaves, bushes and trees
- sewing thread to match your chosen felt colours
- co-ordinating embroidery thread (floss)
- co-ordinating embellishments: mini pompoms, mini buttons, ribbon, etc
- sewing needle and pins
- sewing scissors
- polyester stuffing
To make each house:
1. Use the templates provided to cut one bright house shape and a contrasting bright roof and door shape. Also cut some white windows and a white house shape.
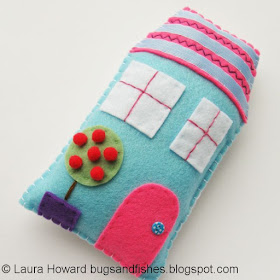
2. Sew on the roof, door and windows. Use running stitch and matching sewing thread, leaving any outer edges unstitched (these will be sewn later).
3. Cut a length of embroidery thread to match the roof and separate half the strands. Backstitch the window frames, sewing two lines in a cross shape.
4. Sew a door handle to each door - a mini pompom or a mini polka dot button.
5. Add some greenery! Use the templates provided to cut out bushes, flowers and leaves or a tree and plant pot as required. Sew a small stitch in the centre of each flower and sew a line of backstitch along the middle of each leaf. Sew the bushes, plant pot and tree with running stitch.
6. Use long single stitches for the flower stalks and sew several stitches clustered together for the thicker tree trunks. Then decorate the plants with pompoms, buttons and embroidery.
To sew the flowers, sew single stitches of embroidery thread radiating from the centre of the felt circle, then add a button or pompom in the centre.
To add flowers on the bushes, sew star shapes of four overlapping stitches.
7. Embellish the roofs with embroidery, buttons, pompoms or ribbon.
To add ribbon stripes, cut ribbon pieces slightly wider than the roof then sew them in place with whip stitch or running stitch, folding the ends over.
8. Place the front and back of each house together. Use half strands of white embroidery thread and blanket stitch to sew them together, leaving a gap for stuffing. Lightly stuff with toy stuffing then sew up the gap.
This tutorial is for personal use only: you can use it to stitch as many felt houses as you want for yourself or as gifts, but please don't make any for sale. You may borrow a photo or two if you want to blog about this project, but remember to credit me and link back to the original source, and do not reproduce my entire post or share the patterns themselves on your site. Thanks!
Enjoyed this free tutorial? Buy me a "coffee" and help support my blog!

Subscribe to my newsletter for a monthly free pattern and visit my crafty tutorial archive for lots more free projects.
Visit my shop to buy my printable PDF sewing patterns:
House A plus greenery for all houses - click here for the template sheet.
House B plus windows and doors for all houses - click here for the template sheet.
House C - click here for the template sheet.
House D - click here for the template sheet.
House E - click here for the template sheet.


these are totally cute!
ReplyDeletethey are adorable!
ReplyDeleteThese are unbelievably cute and there's room for one's imagination! Thanks for the templates - I wouldn't be able to make one for life :)
ReplyDeleteHello dear, I'm a fan of his work, too admire and am very grateful for the beautiful crafts that you share with us. I've done several of them, Christmas ornaments and brooches flowers, and made the most success with my friends. I love houses, and certainly will make these models to me.
ReplyDeleteCongratulations, creativity, a lot of success for you.
kisses
Thanks guys! I LOVED making these and you could decorate them with so many different odds and ends from your crafty stash... lots of creative possibilities :)
ReplyDeletePor Dios!!! Qué belleza!!!
ReplyDeleteThanks, Susana! :)
ReplyDelete