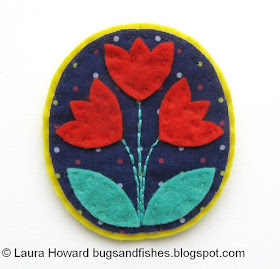
Today I'm sharing an easy how to for making a pretty floral brooch from felt and fabric.
I've written the instructions for making the brooch in the colours pictured (red flowers, green leaves, yellow background, dark blue fabric) but you can of course use any colours you fancy! Just swap my suggested colours for yours when following the instructions.
Any small print fabric would work well for the background - or you could use a plain fabric or another shade of felt instead. Make sure your chosen fabric/felt contrasts nicely with the colours you've chosen for your flowers and leaves, so they stand out clearly.
You will need:
- the templates provided at the bottom of this post
- small pieces of red and green felt for the flowers and leaves
- yellow felt to frame and back the brooch
- dark blue fabric for the background
- sewing thread to match the fabric (dark blue) and all three shades of felt (red, green, yellow)
- green embroidery thread (floss) to match the leaves
- brooch clasp
- sewing scissors
- sewing needles and pins
- iron-on fusible interfacing, iron and ironing board
- optional: tracing paper
To make the brooch:
1. Use the templates provided to cut out three red felt flowers and two green felt leaves.
2. Add iron-on fusible interfacing to the back of your chosen fabric, following the manufacturer's instructions. This will help prevent the edges of your fabric from fraying. If you're using felt instead of fabric, skip this step.
3. Use the oval template to cut out the fabric piece. For added neatness if you're using a patterned fabric, cut your oval template from tracing paper so you can carefully position the template on exactly the bit of pattern you want to cut out.
4. Pin the fabric oval onto a piece of yellow felt. Then use matching dark blue sewing thread to sew the fabric in place, sewing around the edge of the oval with running stitch.
5. Sew the leaves and flowers to the oval as pictured using running stitch and matching green and red sewing threads.
6. Cut a piece of green embroidery thread and separate half the strands (so for six-stranded thread use three strands). Switch to a larger needle if needed and use backstitch to embroider the flower stems. Sew the straight central stem first then sew the other two stems.
Tip: when stitching the two outer stems, I started from the bottom point of each flower then stitched down towards the leaves.
7. Cut the brooch shape out from the yellow backing felt, leaving a narrow yellow border around the fabric oval (as pictured). Then use the oval you’ve just cut out as a template to cut a matching oval from more yellow felt.
8. Turn over the second oval and sew a brooch clasp to the back using a double thickness of yellow sewing thread.
9. Place the front and back of your brooch together (right sides facing outwards) and sew them together with more yellow thread, sewing a line of running stitch flush with the edge of the fabric oval. Finish your stitching neatly at the back.
UPDATE: I've adapted this design to make a floral embroidery pattern!
Click here to view the template sheet, make sure you're viewing it full size then print it at 100%.
This tutorial is for personal use only: you can use it to stitch as many brooches as you want for yourself or as gifts, but please don't make any for sale. You may borrow a photo if you want to blog about this project, but remember to credit me and link back to the original source, and do not reproduce my entire post or share the pattern itself on your site. Thanks!
Enjoyed this free tutorial? Buy me a "coffee" and help support my blog!

Subscribe to my newsletter for a monthly free pattern and visit my crafty tutorial archive for lots more free projects.
Visit my shop to buy my printable PDF sewing patterns:


Oh this is so cute! The style of the flowers reminds me a bit of Arts and Crafts movement patterns.
ReplyDeleteThank you I love your patterns- so generous and currently I am working my way through your book 'super cute felt animals'- making them into magnets for my grand daughter. Waving all the way from Australia.
ReplyDeleteLorraine
This is so cute...Thank you!
ReplyDeletePolly - Cheers! I do love the Arts & Crafts style.
ReplyDeleteLorraine - Thanks so much for your comment! It's always lovely to hear from someone who has bought my book, I'm so glad you're enjoying the animals and I'm thrilled to hear they're going to be magnets, how fun :)
Katrin - Thank YOU x