You can make sparkly Christmas cards...
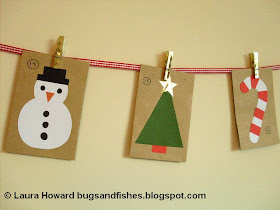
... or an advent garland made from 24 mini envelopes:
Candy Cane Ornaments
Snowmen Ornaments
& Christmas Tree Ornaments
To make the Christmas cards...
1) Cut out all the templates you want to use, turn them over and trace the shapes onto the appropriate colours of paper or card with a pencil. Cut out the coloured shapes and turn them over - any pencil marks will now be hidden at the back. I used plain paper/card for most of the pieces but used some shiny gold wrapping paper for the stars on the Christmas trees.
2) Arrange the pieces and take a note of which pieces are underneath or overlapped by the others and will need to be glued on first. Use a glue stick to glue each piece in position on a blank card, leaving space at the bottom of the card for a message if you want one.
3) Use a black pen to draw eyes and buttons on your snowmen and to write your choice of message along the bottom of the card (it's a good idea to write this in pencil first, or you may end up with an off-centre message like I did! Oops).
4) You could leave the cards as they are if you want (I think the snowman and candy cane cards look rather nice left un-decorated) but it's good to have some sparkle at Christmas, right? So now's the time to add it. You can decorate the shapes with glitter glue, or brush on PVA glue and sprinkle it with glitter in the colour you want...
You could cover the whole tree shape with green glitter, or add glitter to dots or lines of PVA glue / draw on lines or dots with glitter glue, or use PVA glue to stick on some sparkly sequins.
If you're using two colours of glitter (e.g. for the candy cane) make sure one section is totally dry before glueing-and-glittering the next.
Glitter is a bit tricky to photograph (especially the white stuff!) but trust me, the finished cards are SUPER sparkly :)
For extra Christmas loveliness, why not make a felt ornament to match the card and slip it inside when you send it?
Then use a black pen to draw on the eyes and buttons for the snowmen, and to number each envelope. You will need 24 envelopes to make up your advent garland but you don't have to make all the envelopes as detailed as these - you could add some with simple stars and hearts as well.
Then fill the envelopes with happy messages / wrapped sweets / etc and use mini pegs and a length of ribbon or twine to hang up the garland.
This tutorial is for non commercial use only: you can use it for as many cards / garlands as you like to give to friends and family but please don't make any for sale. Please feel free to borrow a couple of photos if you want to blog about this project, but remember to credit me and link back to the original source, and do not reproduce my entire tutorial on your site. Thanks!

Subscribe to my newsletter for a monthly free pattern and visit my crafty tutorial archive for lots more free projects.
Visit my shop to buy my printable PDF sewing patterns:


You always have very good ideas.
ReplyDeleteI'm definitely making some as gift tags as well!
ReplyDeletevery good...
ReplyDeleteGreat!!!!!
ReplyDeleteThanks guys x
ReplyDeletebairozan - gift tags would be a great idea!