The key ingredient to get this look is a roll of dark wood-effect sticky back plastic / self-adhesive vinyl / Fablon / whatever else it might be called in your part of the world! I was lucky enough to find a roll for the princely sum of 49p in a local charity shop (amazingly this find happened the very day I thought of this idea, like some sort of charity shop magic) but you should be able to get a roll quite cheaply from your local DIY emporium:
Start with a nice plain parcel, wrapped in brown paper:
Measure round your parcel, cut a piece of the vinyl to fit the way you want (I opted for a large decorative band around the width leaving the folded ends free for easier unwrapping) and apply it very carefully:
You might want to try applying a test piece to get your technique right before trying it out on your real parcels. Also remember to cut enough to have a bit of overlap and to start on the back of your parcel so the join is hidden and so it won't matter if you don't stick it exactly straight...
If you are a true minimalist this may be enough for you, but if not you'll need a bit of yarn or ribbon or rustic-looking twine...
... I only had a small bit of this and had to cheat and stick the ends to the underneath of the parcel with sticky tape (tsk tsk) but ideally you want to tie your knot on top of your parcel leaving a few inches of string left for securing your leaves.
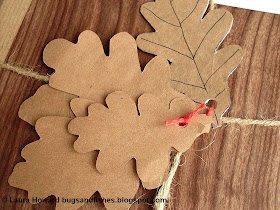
The leaves are simple brown paper oak leaves, like the ones from yesterday's garland how-to (leaf templates included) but with a hole punched in each of them. These are a great way of re-using old brown envelopes, and using a mix of envelopes will give a great mix of browns and different paper textures. For each parcel you'll need three or four leaves in an assortment of sizes plus one large leaf to use as the tag.
Glue the large leaf to some thin card, cut it out and (if you want to) draw on some detail with a black biro or marker pen. Then punch a hole near one end - you can attach some string as I've done here
- or attach the tag directly to your parcel with the string already tied round it. Tie the tag and the other leaves to your parcel in a bunch. If you wanted you could draw the vein detail onto all your oak leaves but I quite like how the tag stands out here:
A simple oak leaf tag like this would make a sweet addition to a more traditional Christmas parcel, or you could make simple woodgrain tags with leftover pieces of your vinyl. Stick your leftover section to a piece of card (I used a cardboard box from some shortbread we scoffed this week) ...
... then draw your shapes on the card in pencil, cut them out, punch a hole and attach some string and voila! Terribly fashionable faux bois tags:
PS, can't get your hands on any wood-effect paper? For a lo-fi, DIY version you could always just take a marker pen to some brown paper and make your own woodgrain giftwrap - just remember to do this before you wrap your parcel so the marker doesn't seep through to your gift!
Please feel free to borrow one or two photos if you want to blog about this project, but remember to credit me and link back to the original source, and do not reproduce my entire tutorial on your site. Thanks!
Enjoyed this gift wrapping idea? Buy me a "coffee" and help support my blog!

Subscribe to my newsletter for a monthly free pattern and visit my crafty tutorial archive for lots more free projects.
Visit my shop to buy my printable PDF sewing patterns:


Love love love this idea! Just wonderful. Thanks :)
ReplyDeleteLovely ideas and very inspiring! Thanks:-)
ReplyDeletewhat a truly fab idea!!! thanks
ReplyDeleteI had already decided to wrap my presents this year in brown paper and string, but this is a lovely extra touch.
ReplyDeletegreat idea! i'm doing only white kraft paper this year - and simple gift tags.
ReplyDeleteSo simple and yet *so* effective. There's a whole meme about "unwrapping" - have you seen the flickr tags? search for unwrapping. t tends to be a apple fetich thing but I've also seen it with craft stuff. Be great to talk to you about how we could do something around giftwrap on Folksy.
ReplyDeleteI love your gift wrapping idea, sticky backed plastic takes me back to my Blue Peter days!
ReplyDeleteJust beautiful - thank you for sharing your ideas with us all!
ReplyDeleteI love the paper leaves, they really make it look good!
ReplyDeleteOh, the vinyl paper tags are genius. I may have to do that this year because I've got rolls of it stashed away and I can't seem to use it up fast enough.
ReplyDeleteThanks for all of your crafty gift wrap ideas!
This is wonderful :D love the look!
ReplyDeleteLOVE this too! (charity shop magic - love that thought too!)
ReplyDelete