Showing posts with label 100 gift wrapping ideas. Show all posts

Tuesday, 28 November 2017

Gift Wrapping with Old Photo Negatives

Do you have a box of old photo negatives from the days before digital cameras?

Strips of negatives from family Christmases, summers holidays and other special memories make quirky and nostalgic gift toppers.


For these pictures I used a gift that was just the right size for the photo negatives, but of course your negatives probably won't perfectly fit your parcel like this! You can trim them to fit smaller gifts, or add several negatives (with thread either side) to larger parcels.

It's really easy to attach the negatives to your gifts. Cut two long pieces of embroidery thread or yarn (one for each side of the negative strip) then use a large sewing needle to thread them through the holes along the edges of the strip.

If you want, you can then add a second thread colour for extra detail. Once your thread is nice and neat, use the excess thread at each end to tie the negatives to your parcel, knotting them securely then trimming any loose threads. You could attach one or two strips, or a whole row for a striped look.

Once the parcel is opened, you can all have fun holding the film up to the light to see the images and explaining to any kids or teens in the vicinity what these strange little dark pictures are and how you all used to take your family snaps with this thing called "film" back in the day.


Don't have any old film negatives, but love the retro photo look? Click here for a how-to on making Polaroid-inspired cards and gift tags featuring your old family photos.


Enjoyed this gift wrapping idea? Buy me a "coffee" and help support my blog!

Buy Me a Coffee at ko-fi.com

Subscribe to my newsletter for a monthly free pattern and visit my crafty tutorial archive for lots more free projects.

Visit my shop to buy my printable PDF sewing patterns:

Wednesday, 25 October 2017

Gift Wrapping with Yarn & Embroidery Thread

Today's gift wrapping ideas are all about yarn and colourful threads.

Yarn.  

This is a really fun way to use up leftover yarn from your knitting and crochet projects! It works best for small parcels (so you can use up shorter scraps) but if you've got whole balls of yarn left over you can wrap larger gifts this way as well.


For this project I selected some colours from my stash that went together (fresh blues and greens, and bright pinks and purples), then tied lots of yarn pieces of around a couple of small parcels to form bands of colour.


Use one length of yarn to test out how long a piece you need to reach around the parcel and tie the yarn securely, then use this bit of yarn as a size guide when cutting the other pieces. Add the yarn pieces gradually, mixing the colours to create a pattern or a nice blend of shades.

Position the yarn so it's all in a neat block in the centre of the package then trim any excess yarn so the underneath of the parcel is nice and neat. You may also want to add a bit of sticky tape to the bottom of the parcel to hold the strands in place if you'll be transporting the parcel.

Woven Threads.

This idea is a lot more subtle than some of my gift wrapping suggestions, but I kinda love it anyway.


For this look, you'll need some embroidery thread (or yarn or narrow ribbons). I used two colours but you could use all one colour or combine lots of different shades (e.g. if you're using bits of yarn or thread left over from other projects).


Cut a length of thread and tie it horizontally across the parcel, with the knot hidden underneath. Trim any excess thread and secure the knot in place with a piece of sticky tape. Repeat to create several horizontal lines across the parcel. If you're using ribbon, secure each end of the ribbon with sticky tape instead of knotting it so the ribbon lies totally flat against the parcel.

Then repeat this process with the second colour, creating vertical lines. This time, weave the thread between the horizontal threads (over, under, over, under, and so on) before securing it. Ta-da! One woven parcel.

Enjoyed this gift wrapping idea? Buy me a "coffee" and help support my blog!

Buy Me a Coffee at ko-fi.com

Subscribe to my newsletter for a monthly free pattern and visit my crafty tutorial archive for lots more free projects.

Visit my shop to buy my printable PDF sewing patterns:

Monday, 16 October 2017

Gift Wrapping from Your Garden: Lavender, Hydrangeas & Leaves

My gift-wrapping series continues with three ideas for decorating your gifts with bits and pieces from your garden. You've got to take care when transporting gifts topped with cuttings, to ensure they don't get damaged, but it'll be worth it for the "oooh!"s they elicit.

Lavender & Washi Tape. 

If you've got a lavender bush in your garden, you'll know you end up with a lot of cuttings when you trim it at the end of summer! Dried lavender smells amazing and the stems look lovely... so why not use them to decorate your gifts?


I rescued some stems from last year's cuttings pile and trimmed them with scissors, laying them out across the parcels to plan my arrangement.

Tear strips of washi tape (I used a lovely pink polkadot design) and stick them to the parcel at various angles - leaving space to add the final piece of tape in a moment.

Arrange the lavender pieces, then carefully stick down the final piece of tape, pressing the tape flush around the stems to hold them firmly in place.

Hydrangeas. 

I have been slightly obsessed with hydrangeas lately (I blame Instagram, honestly). My mum's hydrangeas were such an eye-popping bright pink at the height of summer, then faded into these irresistibly lovely, soft tones. You could use a clipping from a hydrangea bush for gift-wrapping during the summer, of course, but I think this is a great way to make the most of your hydrangeas in autumn, when the blooms are beginning to fade but still have a lot of charm to them.


One hydrangea bloom makes for a spectacular gift topper. Cut a smallish bloom (one that you can lay on its side) with a few inches of stem. Position it on your parcel and stick it in place with a couple of strips of pretty washi tape. Super easy, but really rather gorgeous. I think the faded tones look particularly lovely with the brown paper I like to use for my gift wrapping.

You can also use the larger blooms as gift toppers - they look amaaaaazing.


To make use of one of the larger blooms, you'll need to cut the stem short so it will sit flat on top of the parcel. Cut two long pieces of bakers twine (or other string, narrow ribbon, etc). Tie the pieces of twine to the top of the hydrangea stem, at right angles from each other (the way hydrangea flowers grow out from the main stem makes it very easy to secure the twine). Place the bloom in the centre of the parcel and wrap the four ends of the wind around, knotting them securely underneath, then trim any excess twine.

Tip: set the parcel on its side as you tie the knots underneath, so you can keep two hands free for the knots and not squish the hydrangea beneath the parcel. Alternatively, get someone else to help out and hold the parcel as you secure the twine.

Painted Leaves. 

My third nature-inspired gift wrapping project is all about leaves.


I love the texture of these leaves and the contrast of the crisp white shapes against the brown paper - though you can, of course, use any colour paint you want. You could also paint several smaller leaves and arrange them in a row, or use a marker to carefully write a message or name on the painted leaf like a tag.

I used white acrylic craft paint to paint my leaves. I painted several coats on each side, leaving the leaves to dry between coats. The paint helps the leaves keep their shape but they're still quite delicate, so take care when working with them!

Position the leaves on top of your parcels and attach them by wrapping round and round with white sewing thread, creating a subtle stripey effect. For leaves without stems, you could alternatively use double-sided tape or craft glue to attach the leaves - but bear in mind the leaf's 3D shape will mean only parts of the leaf will be touching the paper, so make sure to add your adhesive at those points.

Enjoyed this gift wrapping idea? Buy me a "coffee" and help support my blog!

Buy Me a Coffee at ko-fi.com

Subscribe to my newsletter for a monthly free pattern and visit my crafty tutorial archive for lots more free projects.

Visit my shop to buy my printable PDF sewing patterns:

Monday, 9 October 2017

Crafty Gift Wrapping Ideas: Pompoms, Buttons, Feathers & Beads

Last year I set myself a (perhaps slightly overambitious) creative challenge: to come up with 100 creative gift wrapping ideas. I managed the first ten quite quickly in a flurry of enthusiasm... then I packed up all my stuff and moved across the country and got busy with home renovations and completely forgot about my challenge! Oops.

Back when I started the challenge I'd thought "I'll just do this as an Instagram thing! Have some fun, take some pictures, maybe do some quick round-up blog posts! I won't worry about blogging about it properly!"... but you know, looking back at it, I'm annoyed that I didn't take a bit of extra time to blog about it properly. Instagram and Twitter and so on can be a lot of fun, but they're so fleeting.

(I've been doing monthly(ish) blog posts featuring my Instagram pics for this very reason - it's fun sharing photos on Instagram, etc, but blogging about them feels a bit more permanent, like putting photos in an album, something to look back on in future years).

So, I'm finally going to start blogging about this project properly! I've got last year's ideas to catch up on and then I'll blog about the remaining 90 (!!) ideas sporadically, as and when I get round to, you know, actually coming up with them (this may take me a while).

To kick things off, here's four ways you can use crafty supplies to jazz up your gift wrapping. I like to use brown paper for wrapping my gifts as it makes a nice simple base onto which you can put as much colour and general loveliness as you want, but you guys can (of course) use any gift wrap you fancy as your "base" to start with...

Pompoms.

Pompoms are awesome: so colourful, so fluffy, so fun! You can buy big bags of these from the kids section of craft shops, in loads of great colours.

Brown paper parcels decorated with colourful pompoms

Three large pompoms in a row look great, and just one large pompom would look great stuck to a small gift. With smaller pompoms you can arrange them in a colourful line across your parcel or stick them at random.

I just stuck pompoms to the top of my parcels, but you could stick them on the sides as well for ultimate fluffiness.

Brown paper parcels decorated with colourful pompoms

I used double-sided sticky tape to attach my pompoms to the paper. Double-sided tape is easy to use (stick the tape to the paper then the pompom on top) but it doesn't hold the pompoms very firmly - it'd be fine if, say, you were wrapping a gift and putting it on the breakfast table to be opened on a birthday morning, but not great if you were carrying a parcel to a birthday party and lost a bunch of pompoms along the way!

For a firmer hold, you can use craft glue but remember that wet glue might seep through the paper, so only use it for packages in boxes or ones wrapped in plastic (e.g. some bubblewrap) so the item inside won't get damaged.

You could also make a string of pompoms to wrap around your gift (see the bottom right of the photos, above). Use a large, sharp sewing needle to thread lots of pompoms on a piece of embroidery thread then wrap the thread round and round the parcel, positioning the pompoms nicely. I secured the ends of my thread with pieces of sticky tape.

Beads.

This wrapping idea is super colourful, and the gift wrapping is actually a second (small) gift, as the beads can be kept and re-used once the parcel is opened. I used some gorgeous painted wooden beads, but bright plastic ones would look awesome too. 

A brown paper parcel wrapped with yarn and colourful wooden beads

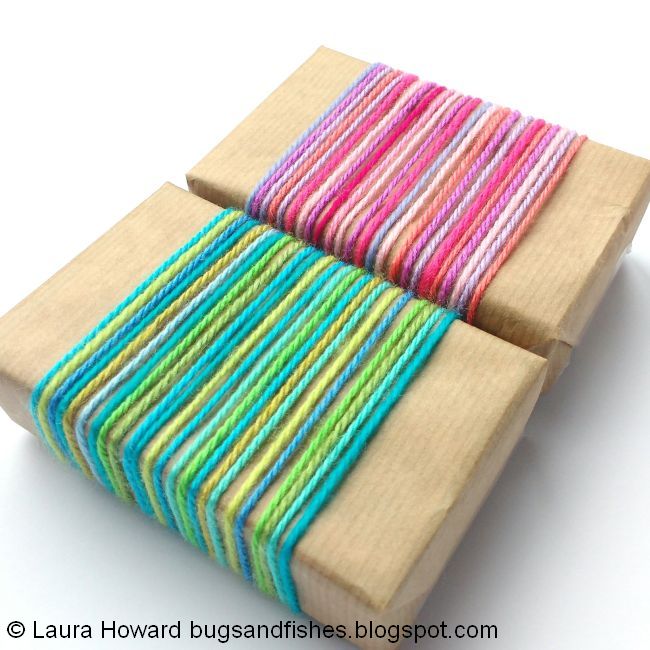
String lots of large beads onto a long piece of yarn - yarn is perfect for this as the fibres help keep the beads in place. I love this extra fluffy yarn, it's a great colour and the fluffiness adds another interesting texture to the parcel. If you don't knit, you could use string or embroidery thread instead... or just ask a knitter you know if they have any leftover bits of yarn going spare!

To decorate the gift, secure one end of the yarn to the bottom of the parcel with a piece of tape then wind it round and round and round - positioning the beads so they sit along the top of the parcel only. Once you're happy with how it looks, cut the yarn and secure the end underneath the parcel with another piece of tape.

Buttons. 

This is a great way to wrap a gift for a crafty friend - you can never have too many buttons, right??

Button gift wrapped parcels surrounded by lots of buttons

Plastic buttons stick brilliantly with double sided tape. You could stick them at random across the parcel, or stick them in a row down the centre (like the row of pompoms).

For a really fancy look, mark out simple designs with small buttons (or big buttons on a large parcel). I chose a heart, but initials would also look great. Plan the button arrangement first, laying them out on your desk or a piece of paper then transferring them one by one to the top of the parcel and sticking them in place.

The double sided tape will leave a slightly sticky residue on the buttons, but they can easily be cleaned then re-used for more gift wrapping or other crafty projects.

Feathers.

Another kids craft favourite, bright feathers are great for quick, easy, colourful gift wrapping. This idea definitely works best with a totally flat surface to work with, like a book or a gift in a box.

A brown paper parcel decorated with a rainbow of bright feathers

Use a dab of craft glue to hold each feather in place - remember that the glue could seep through the paper so use this for a gifts in boxes or wrapped in plastic (bubblewrap, etc) so they won't get damaged by the glue.

I arranged my bright feathers in colour order but you could choose feathers that are all the same colour to co-ordinate with colourful gift wrap, or mix and match colours. The bigger your parcel, of course, the more feathers you can add.

Enjoyed this gift wrapping idea? Buy me a "coffee" and help support my blog!

Buy Me a Coffee at ko-fi.com

Subscribe to my newsletter for a monthly free pattern and visit my crafty tutorial archive for lots more free projects.

Visit my shop to buy my printable PDF sewing patterns:

Wednesday, 21 September 2016

100 Gift Wrapping Ideas, Part One: From Pompoms to Hydrangeas to Old Photo Negatives!

I recently set myself a challenge, to share 100 crafty gift wrapping ideas over the coming weeks and months. And... I've just completed the first 10 ideas! Hurrah!

collage of gift wrapping ideas

I know I'm only a little way through this challenge, but I'm really enjoying it so far and I hope you guys are too.

I've started with a plain, brown paper parcel each time. I love the simplicity of brown paper (it's a great blank canvas!) but you could use any plain gift wrap you fancy.

1. Pompoms.

gifts decorated with pompoms

2. Beads.

parcel decorated with wooden beads and yarn

3. Lavender & Washi Tape.

gifts decorated with polkadot washi tape and lavender

4. Buttons.

parcels decorated with pastel buttons

5. Hydrangeas.

brown paper parcel with a hydrangea bloom as a gift topper
three gifts decorated with hydrangea blooms

6. Painted Leaves.

simple parcels decorated with painted leaves

7. Feathers. 

parcel decorated with colourful craft feathers

8. Woven Threads. 

parcel wrapped with a grid of woven threads

9. Yarn. 

gifts wrapped with bright and colourful yarn scraps

10. Photo Negatives. 

parcel decorated with old photo negatives


And now... my challenge continues! You can follow along on my Instagram, Twitter and Facebook. I'm sharing the gift wrapping ideas under the hashtag #100giftwrappingideas as I slowly work my way up to 100.

You'll also find lots of creative gift wrapping ideas in my archive of free crafty tutorials (scroll down to the bottom of the page, you'll find card and gift wrap ideas below the Christmas tutorials).

P.S. Subscribe to my newsletter for a monthly free pattern and visit my crafty tutorial archive for lots more free projects.

Visit my shop to buy my printable PDF sewing patterns:


100 Gift Wrapping Ideas: Part One

Thursday, 1 September 2016

A New Crafty Challenge: 100 Gift Wrapping Ideas

I've started a new project!

I've set myself the challenge of sharing 100 crafty gift wrapping ideas over the coming weeks and months.


I love giving creatively wrapped gifts, and I'm hoping this will be a fun challenge... and something a bit different to my usual projects.

I'm going to start with a simple brown paper parcel each time, sharing the results on my Instagram, Twitter and Facebook under the hashtag #100giftwrappingideas, then I'll be blogging about the ideas in batches of 10 as I work my way up to 100.

I'm not setting myself a time limit to complete the challenge, I'm just gonna go with the creative flow and see what happens.

As you might have guessed, the first idea involves lots of fluffy pompoms!

In the meantime, you can find lots of creative gift wrapping ideas in my archive of free crafty tutorials (scroll down to the bottom of the page, you'll find card and gift wrap ideas below the Christmas tutorials).