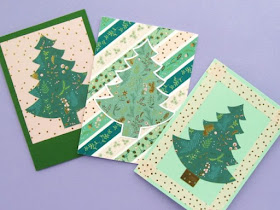
UPDATE: follow the links to find all these DIY Christmas card ideas here on my blog!
1. Washi Tape.
2. Simple Shapes and Crafty Scraps.
3. Simple Lettering.
4. Christmas Trees.
5. Baubles.
---
My latest tutorials for the Village Haberdashery's blog are all about making your own Christmas cards!
I used some gorgeous patterned paper, washi tape and rubber stamps from the Village Haberdashery's shop to make a whole bunch of festive cards. The cards were so much fun to make,and I totally fell in love with the
supplies I used - especially that washi tape, isn't it lovely?
In part one you'll find how-tos for:
Simple washi tape cards:
Getting creative with layers and geometric shapes.
And using crafty scraps to decorate your cards.
Then in part two, you'll find instructions and templates for making cards decorated with...
Lettering:
Christmas trees:
And baubles:
You'll find part one and part two over on the Village Haberdashery's blog, and all the materials you'll need to make the cards in their online shop.
Fancy some more free tutorials? Subscribe to my newsletter for a monthly free pattern and visit my crafty tutorial archive for lots more free projects.
Pages
▼
Thursday, 14 December 2017
Tuesday, 12 December 2017
More Stuff Added to My Insta-sale!
At the weekend I added lots more things to my destash and declutter sale over on Instagram.
There's fabric...
... lots of other crafty supplies...
... and a few other lovely bits & bobs:
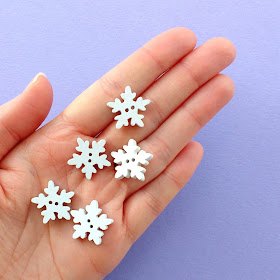
... cute snowflake buttons...
... and these mouse and cheese brooches:
Prices start from just 25p (minimum spend £1). Click here to see all the available listings, with lots more info and photos.
You can leave a comment on an item to claim it, but if you don't use Instagram don't worry! If you see things you want to purchase, just send me a message via my contact form to let me know what you're interested in.
I've listed the price and UK postage of each item, but I'll combine the postage for each parcel and only charge what it actually costs to post. In the UK you can send a shoebox sized parcel weighing up to 2 kilos second class for just £2.90! I'm happy to post internationally, too, just get in touch and I'll look up the postage costs and get back to you as soon as possible.
There's fabric...
... lots of other crafty supplies...
... and a few other lovely bits & bobs:
I've also reduced the prices of a whole bunch of items left over from previous sales, including craft books...
... cute snowflake buttons...
... and these mouse and cheese brooches:
Prices start from just 25p (minimum spend £1). Click here to see all the available listings, with lots more info and photos.
You can leave a comment on an item to claim it, but if you don't use Instagram don't worry! If you see things you want to purchase, just send me a message via my contact form to let me know what you're interested in.
I've listed the price and UK postage of each item, but I'll combine the postage for each parcel and only charge what it actually costs to post. In the UK you can send a shoebox sized parcel weighing up to 2 kilos second class for just £2.90! I'm happy to post internationally, too, just get in touch and I'll look up the postage costs and get back to you as soon as possible.
Friday, 8 December 2017
How To Make Leafy Paper Snowflakes
Today I'm sharing a very special guest post: Jessica's leafy paper snowflake tutorial!
Jessica posts beautiful, colorful, nature-filled photos on Instagram as vanillalemoncake and started the inspiring hashtag #natureflatlays. Her pictures always make me smile when they pop up in my feed!
She shared a tutorial a few years ago for making these gorgeous leafy paper snowflakes and has kindly agreed that I can repost it here on my blog to share the leafy snowflakey goodness with you all (hurrah!).
I adore these snowflakes. They're a perfect blend of autumn and winter: a quirky alternative to a leaf garland, a leafy twist on the classic paper snowflake (you know I love those), and ideal decor for chilly autumn days or those early weeks of winter when the last few leaves are still hanging onto the trees.
To make a leafy paper snowflake, you will need:
- A square of paper (cut from a sheet of A4)
- Scissors
- A ruler
- And a pen or pencil
To make the snowflakes...
1. Fold the paper in half by bringing opposite corners of the square together. Run the ruler along every fold you make, to ensure crisp edges.
2. With the folded triangle facing you, as shown above, fold it in half again by taking the bottom right corner up to meet the top left corner.
3. You will now have two flaps of paper at top left (see above). Take the top flap and fold it down towards the bottom, so the corners meet.
4. Pick up the shape you've made, and fold the second flap down behind to meet the bottom corner. You now have your folded shape.
5. Turn the triangle round so that the folded point is towards you, the two folded edges of the triangle either side, and the unfolded edges of paper away from you.
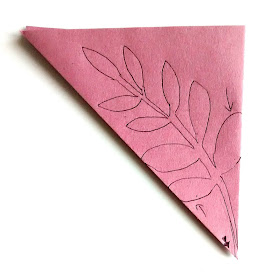
Draw a leaf outline onto the triangle - use the photos in this tutorial as a guide, or get inspired by your favourite leaves!
The stem should grow from the point (see the filled arrow drawn on the paper, below). The leaf edge MUST incorporate part of the folded edge each side (see the arrows, below) otherwise the snowflake will not work. Give your stem enough width to avoid it being too fragile.
When you cut, take care to not cut along the folded edges within your leaf design.
6. Time to cut out the leaves! Hold the folds together firmly as you go, to ensure you cut all the layers identically. Cut along the leaf outline. Make sure you don't cut the parts that touch the folded edges.
7. Now very carefully unfold your leaf. Each leaf should be joined to its neighbours along that folded edge you left intact. Congratulations... you just made your first leafy paper snowflake!
Click here to visit vanillalemoncake on Instagram, see all of Jessica's lovely photos and meet Oliver the hamster!
-----
Subscribe to my newsletter for a monthly free pattern and visit my crafty tutorial archive for lots more free projects.
Visit my shop to buy my printable PDF sewing patterns:
Jessica posts beautiful, colorful, nature-filled photos on Instagram as vanillalemoncake and started the inspiring hashtag #natureflatlays. Her pictures always make me smile when they pop up in my feed!
She shared a tutorial a few years ago for making these gorgeous leafy paper snowflakes and has kindly agreed that I can repost it here on my blog to share the leafy snowflakey goodness with you all (hurrah!).
I adore these snowflakes. They're a perfect blend of autumn and winter: a quirky alternative to a leaf garland, a leafy twist on the classic paper snowflake (you know I love those), and ideal decor for chilly autumn days or those early weeks of winter when the last few leaves are still hanging onto the trees.
To make a leafy paper snowflake, you will need:
- A square of paper (cut from a sheet of A4)
- Scissors
- A ruler
- And a pen or pencil
1. Fold the paper in half by bringing opposite corners of the square together. Run the ruler along every fold you make, to ensure crisp edges.
2. With the folded triangle facing you, as shown above, fold it in half again by taking the bottom right corner up to meet the top left corner.
3. You will now have two flaps of paper at top left (see above). Take the top flap and fold it down towards the bottom, so the corners meet.
4. Pick up the shape you've made, and fold the second flap down behind to meet the bottom corner. You now have your folded shape.
5. Turn the triangle round so that the folded point is towards you, the two folded edges of the triangle either side, and the unfolded edges of paper away from you.
Draw a leaf outline onto the triangle - use the photos in this tutorial as a guide, or get inspired by your favourite leaves!
The stem should grow from the point (see the filled arrow drawn on the paper, below). The leaf edge MUST incorporate part of the folded edge each side (see the arrows, below) otherwise the snowflake will not work. Give your stem enough width to avoid it being too fragile.
When you cut, take care to not cut along the folded edges within your leaf design.
6. Time to cut out the leaves! Hold the folds together firmly as you go, to ensure you cut all the layers identically. Cut along the leaf outline. Make sure you don't cut the parts that touch the folded edges.
7. Now very carefully unfold your leaf. Each leaf should be joined to its neighbours along that folded edge you left intact. Congratulations... you just made your first leafy paper snowflake!
Click here to visit vanillalemoncake on Instagram, see all of Jessica's lovely photos and meet Oliver the hamster!
-----
Visit my shop to buy my printable PDF sewing patterns:
Wednesday, 6 December 2017
A Year of Wreaths: November Holly Wreath
UPDATE: my Holly Christmas wreath tutorial is now available as a printable PDF pattern on my Patreon.
Subscribe to get instant access to a growing library of PDF embroidery patterns and craft tutorials, and updates when I add something new!
Click here to see all 12 seasonal wreaths in this series!
-----
The penultimate wreath tutorial for A Year of Wreaths is now available!
November's wreath features felt holly leaves and felt ball "berries" in a classic festive design:
I used a cheerful red yarn to wrap my wreath, but I think this design would also look fab (maybe even more so) on a pale, neutral background to really make the colours and shapes of the holly pop.
Subscribe to my newsletter for a monthly(ish)( free pattern and visit my crafty tutorial archive for lots more free projects.
Thursday, 30 November 2017
Tutorial: DIY Reindeer Novelty Christmas Jumper
Today I'm sharing a tutorial for turning a plain jumper into a cute novelty Christmas jumper!
Add some festive fun to your wardrobe this winter with this applique reindeer design, complete with mini jingle bells on the antlers and a fluffy pompom nose and tail. Perfect for Christmas parties and festive selfies!
Don't fancy making a novelty jumper? You could also use this tutorial to decorate the front and back of a cushion (or maybe even a pair of cushions) and add some festive cuteness to your decor.
This tutorial originally appeared in docrafts Creativity magazine.
To make this project, you will need:
- A jumper!
- The templates provided at the bottom of this post
- Felt in the following colours: light brown, dark brown, white, black, and red.
- Matching sewing threads
- Small jingle bells
- A red pompom for the nose, and a large white pompom for the tail
- Sewing scissors
- A sewing needle and pins
- A ruler
Important: Hand wash the finished jumper carefully in lukewarm water. Definitely do not tumble dry!
To decorate the jumper:
1. Use the templates provided to cut the pieces from felt in the colours marked.
2. Position the light brown front body and head and the dark brown antler pieces on the front of the jumper and pin them into place. Use plenty of pins and take care to only pin through the front of the jumper.
Tip: Use a ruler to help you position the reindeer in the centre of the jumper
3. Sew the felt to the jumper, sewing round the edges with whip stitch and matching threads and removing the pins as you sew. Throughout this project take care to only sew through one layer of the jumper and don't sew the front and back together by accident. Check your stitching at regular intervals so you don't have to unstitch a large section if you make a mistake!
4. One by one, position the white ear details, the black eyes and the white belly in position as shown. Pin them in place then stitch around the edges with whip stitch and matching thread. Remove the pins as you sew each piece in place.
5. Construct the red bow by sewing the pieces in the following order: ribbon, right tail, left tail, left and right bow, and centre circle. One by one, pin each shape in place, sew it with whip stitch and red sewing thread, remove the pin(s) then sew the next shape.
6. Turn the jumper over and arrange the back pieces as pictured: the light brown head and neck piece, the light brown body and the two dark brown antlers. The back of the jumper shows the back of the reindeer, so the antlers should be flipped to be a mirror image of the front. Note that unlike the front antlers, the bottom of the back antlers are hidden behind the head shape.
7. Pin the pieces then sew them with whip stitch in matching thread, removing the pins as you sew.
8. Add jingle bells to the front antlers. Use a double thickness of dark brown thread, sewing each bell securely with three or four stitches. To avoid carrying your thread between the bells and creating long, snag-able stitches inside the jumper, finish your stitching after sewing each bell.
9. Sew a red pompom to the reindeer's face to create the nose. Use a double thickness of red thread, sewing a few stitches through the centre of the pompom.
10. Finally, add a large white pompom to the back of the reindeer to create the tail. Sew it securely in place with a few stitches of white thread.
The front of your finished jumper should now look like this...
... and the back like this:
This tutorial is for personal use only: you can use it to make as many jumpers (or cushions!) as you want for yourself or as gifts, but please don't make any for sale. You may borrow a photo or two if you want to blog about this project, but remember to credit me and link back to the original source, and do not reproduce my entire post or share the pattern itself on your site. Thanks!
Enjoyed this free tutorial? Buy me a "coffee" and help support my blog!

Subscribe to my newsletter for a monthly free pattern and visit my crafty tutorial archive for lots more free projects.
Visit my shop to buy my printable PDF sewing patterns:
Follow the links to open each template sheet in a new window or tab. Download the image or make sure you're viewing it at full size and print at 100%.
Add some festive fun to your wardrobe this winter with this applique reindeer design, complete with mini jingle bells on the antlers and a fluffy pompom nose and tail. Perfect for Christmas parties and festive selfies!
Don't fancy making a novelty jumper? You could also use this tutorial to decorate the front and back of a cushion (or maybe even a pair of cushions) and add some festive cuteness to your decor.
This tutorial originally appeared in docrafts Creativity magazine.
To make this project, you will need:
- A jumper!
- The templates provided at the bottom of this post
- Felt in the following colours: light brown, dark brown, white, black, and red.
- Matching sewing threads
- Small jingle bells
- A red pompom for the nose, and a large white pompom for the tail
- Sewing scissors
- A sewing needle and pins
- A ruler
Important: Hand wash the finished jumper carefully in lukewarm water. Definitely do not tumble dry!
To decorate the jumper:
1. Use the templates provided to cut the pieces from felt in the colours marked.
2. Position the light brown front body and head and the dark brown antler pieces on the front of the jumper and pin them into place. Use plenty of pins and take care to only pin through the front of the jumper.
Tip: Use a ruler to help you position the reindeer in the centre of the jumper
3. Sew the felt to the jumper, sewing round the edges with whip stitch and matching threads and removing the pins as you sew. Throughout this project take care to only sew through one layer of the jumper and don't sew the front and back together by accident. Check your stitching at regular intervals so you don't have to unstitch a large section if you make a mistake!
4. One by one, position the white ear details, the black eyes and the white belly in position as shown. Pin them in place then stitch around the edges with whip stitch and matching thread. Remove the pins as you sew each piece in place.
5. Construct the red bow by sewing the pieces in the following order: ribbon, right tail, left tail, left and right bow, and centre circle. One by one, pin each shape in place, sew it with whip stitch and red sewing thread, remove the pin(s) then sew the next shape.
6. Turn the jumper over and arrange the back pieces as pictured: the light brown head and neck piece, the light brown body and the two dark brown antlers. The back of the jumper shows the back of the reindeer, so the antlers should be flipped to be a mirror image of the front. Note that unlike the front antlers, the bottom of the back antlers are hidden behind the head shape.
7. Pin the pieces then sew them with whip stitch in matching thread, removing the pins as you sew.
8. Add jingle bells to the front antlers. Use a double thickness of dark brown thread, sewing each bell securely with three or four stitches. To avoid carrying your thread between the bells and creating long, snag-able stitches inside the jumper, finish your stitching after sewing each bell.
9. Sew a red pompom to the reindeer's face to create the nose. Use a double thickness of red thread, sewing a few stitches through the centre of the pompom.
10. Finally, add a large white pompom to the back of the reindeer to create the tail. Sew it securely in place with a few stitches of white thread.
The front of your finished jumper should now look like this...
... and the back like this:
This tutorial is for personal use only: you can use it to make as many jumpers (or cushions!) as you want for yourself or as gifts, but please don't make any for sale. You may borrow a photo or two if you want to blog about this project, but remember to credit me and link back to the original source, and do not reproduce my entire post or share the pattern itself on your site. Thanks!
Enjoyed this free tutorial? Buy me a "coffee" and help support my blog!

Subscribe to my newsletter for a monthly free pattern and visit my crafty tutorial archive for lots more free projects.
Visit my shop to buy my printable PDF sewing patterns:


